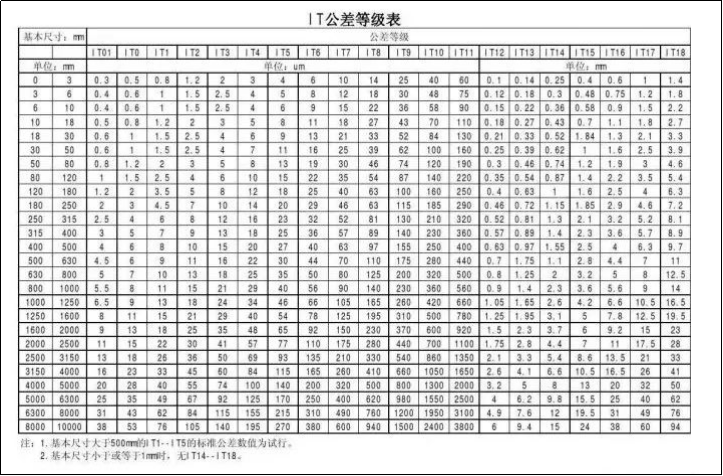
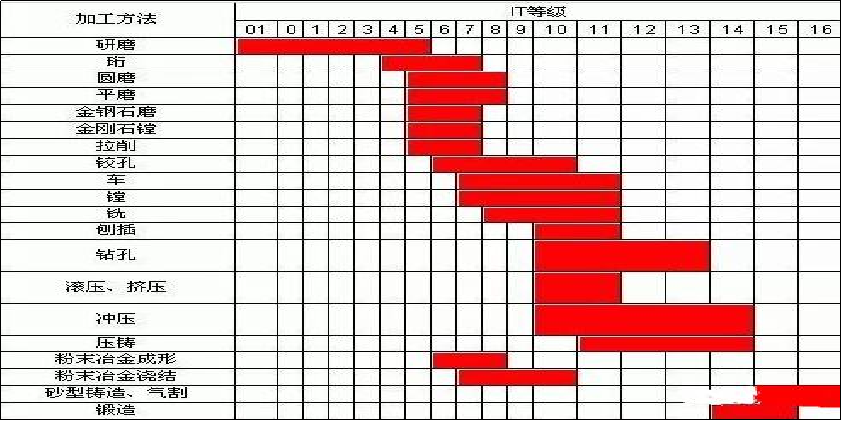
The machining precision is mainly used to characterize the fineness of products, such as CNC turning parts and CNC milling parts, and is a term used to evaluate the geometric parameters of machined surfaces. Machining accuracy is measured by tolerance grade. The smaller the grade value, the higher the accuracy.
There are 20 tolerance classes from IT01, IT0, IT1, IT2, IT3 to IT18, of which IT01 represents the highest processing accuracy of the part, IT18 represents the lowest processing accuracy of the part, general mining machinery belongs to IT7, and general agricultural machinery belongs to IT8. According to the different functions of product parts, the machining precision required to be achieved and the processing form and process selected also differ. This paper introduces the machining accuracy of turning, milling, planing, grinding, drilling, boring, and other common machining forms.
CNC Turning
The cutting process in which the workpiece rotates and the turning tool moves in a straight line or curve in the plane. Turning is generally carried out on a lathe, which is used to process the internal and external cylindrical surfaces, end faces, conical surfaces, forming surfaces, and threads of workpieces.
The turning accuracy is generally IT8-IT7, and the surface roughness is 1.6-0.8 μ m.
1) The rough turning shall adopt considerable cutting depth and significant feed rate to improve the turning efficiency without reducing the cutting speed. Still, the machining accuracy can only reach IT11, and the surface roughness is R α 20—10 μ m.
2) High speed, low feed rate, and cutting depth shall be adopted as far as possible for semi-finish turning and finish turning. The machining accuracy can reach IT10-IT7, and the surface roughness is R α 10—0.16 μ m.
3) High-speed precision turning of nonferrous metal parts with a diamond turning tool finely polished on a high-precision lathe can make the machining accuracy reach IT7-IT5, and the surface roughness is R α 0.04—0.01 μ m. This kind of turning is called "mirror turning."
CNC Milling
Milling refers to rotating multi-edge tools to cut workpieces, a highly efficient processing method. It is suitable for machining planes, grooves, various forming surfaces (such as spline, gear, and thread), and the unique surfaces of the die. It can be divided into forward milling and reverse milling according to the same or opposite direction of the main movement speed and the workpiece feed direction during milling.
The machining accuracy of milling can generally reach IT8~IT7, and the surface roughness is 6.3~1.6 μ m.
1) The machining accuracy during rough milling is IT11~IT13, and the surface roughness is 5~20 μ m.
2) Machining accuracy IT8~IT11 and surface roughness 2.5~10 in semi-precision milling μ m.
3) The machining accuracy during precision milling is IT16~IT8, and the surface roughness is 0.63~5 μ m.
Planing
Planning is a cutting method that uses a planer to make a horizontal relative linear reciprocating motion on the workpiece, mainly used for the contour processing of parts.
The machining accuracy of planing can generally reach IT9~IT7, and the surface roughness is Ra6.3~1.6 μ m.
1) Roughing machining accuracy can reach IT12~IT11, and surface roughness is 25~12.5 μ m.
2) The semi-finishing machining accuracy can reach IT10~IT9, and the surface roughness is 6.2~3.2 μ m.
3) The precision of finish planing can reach IT8~IT7, and the surface roughness is 3.2~1.6 μ m.
Grinding
Grinding refers to the processing method of using abrasive and abrasive tools to cut off excess materials on the workpiece, which belongs to finishing and is widely used in the machinery manufacturing industry.
Grinding is usually used for semi-finishing and finishing, with the accuracy of IT8~IT5 or even higher, and the surface roughness is generally 1.25~0.16 μ m.
1) The surface roughness of precision grinding is 0.16~0.04 μ m.
2) Ultra-precision grinding surface roughness is 0.04-0.01 μ m.
3) The surface roughness of mirror grinding can reach 0.01 μ M below.
Drilling
Drilling is an essential method of hole processing. Drilling is often done on drilling and lathes or boring or milling machines.
The machining accuracy of drilling is relatively low, generally reaching IT10, and the surface roughness is gtypically12.5~6.3 μ m. After drilling, reaming and reaming are often used for semi-finishing.
Boring
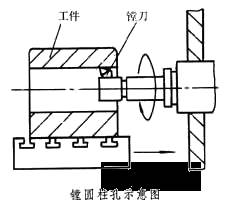
Boring is an inner diameter cutting process that uses a tool to enlarge a hole or other circular contour. Its application range is generally from semi-rough machining to finishing. The tool is usually a single-edge dull tool (called a boring bar).
1) The boring accuracy of steel materials can generally reach IT9~IT7, and the surface roughness is 2.5~0.16 μ m.
2) The machining accuracy of precision boring can reach IT7~IT6, and the surface roughness is 0.63~0.08 μ m.
Post time: Nov-22-2022


